Disclaimer
One thing I must mention before turning the wrenches. There are numerous ways to achieve various tasks when making adjustments to your car. In other words, if you're fighting a loose condition there are many adjustments you can make to tighten the chassis up. There are a number of adjustments, that when combined with other chassis adjustments, will work better than others. The secret is to find the best-balanced setup that allows all components to work together in a complete package. Sure you could make drastic adjustments in one area to make the car turn into the corner better, but this isn't necessarily the correct answer for getting the most out of your setup or turning the quickest times on the track. When making adjustments there are a number of ways to go about trying to get a car to perform to it's maximum. I'm often reminded of this when I visit my local short track and talk to various drivers that run in the same division. It's not surprising how one driver can run with 1" of tire stagger and another runs with 3" of tire stagger yet both run the same identical lap times. How is this possible? It's because they have different adjustments elsewhere in their chassis that allows their car to work with either 1 or 3" of stagger. The same thing can apply to N2003 under various conditions.
Simply making one adjustment as per the guide below may not necessarily give you the immediate results you're looking for. You may have other chassis adjustments that are not quite right masking the problems your trying to adjust for. Because of this factor, you may not see as drastic a change in your setup after just one change. You may have to readjust another chassis component to so call "free" up your original adjustment. If you feel your setup is close, yet seems to be lacking that one minor adjustment, it may be more involved that just adjusting one more component. You may have to "undo" another few adjustments elsewhere then go back to your original adjustment to get it just right. For every action you take, there will be a counteraction that may not appear at first to be in the best interest of your setup. There may be times when you may have to take two steps back to gain one step forward. Because of this, chassis adjustments can become frustrating to figure out. It isn't easy, as many WC teams find out on any given Sunday. Perseverance & patience are required when playing this chassis setup game. Because there are so many variables involved in chassis setups, there aren't always definitive answers to every solution. If you try something below and you don't see the results your looking for, ask yourself why. Do I have something adjusted elsewhere that may be incorrect that is preventing me from seeing the changes I should be seeing? Use the information I've provided below as a guideline to better understand how, what, and why things work the way they do. Please understand and realize that because of all the variables involved, you may experience mixed results after performing the aforementioned adjustments.
Camber
Camber is the inward or outward tilt of the wheel at the top of the tire. It applies to all four wheels of the racecar. Camber is a major part of the front-end alignment that also involves caster and toe. Camber can be positive, negative or neutral (straight up). Camber is the single most important alignment on a racecar. Camber angles are one of the variables that determine tire performance, load, slip angle, pressure, and temperatures. Camber also helps steer the car. A cambered tire will pull a car in the same direction in which the top of the tire is leaning.
Negative camber is the tilt of the top of the tire towards the center of the vehicle. Positive camber is the tilt of the top of the tire away from the center of the vehicle.
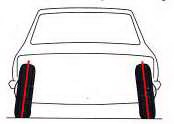
Negative Camber
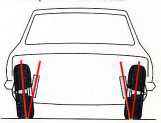
Positive Camber
Camber adjustments are utilized to help maintain the maximum grip allowable from the surface of the tire through the corners of the track. Proper camber adjustments are critical in achieving maximum cornering speeds. When camber is set correctly it allows the entire surface or footprint of the tire to adhere to the track maximizing the use of the contact patch when taking. The reason camber adjustments are made, is to keep the maximum footprint of the tire on the ground while cornering as the suspension travels up and down and body roll takes place.
As the suspension goes through travel or bump in a corner, the camber changes as the body rolls. This is often called camber gain. Camber gain is the number of degrees of camber that the front wheels lose or gain from static (down the straightaway) to dynamic (in the middle of the turns). There is an optimum amount of camber gain for each of the front wheels. The amount of track banking plays an important factor in determining the best camber for your car. As the front suspension compresses, both the LF and RF tires gain more negative camber. This is undesirable and therefore the LF is setup with more positive camber to compensate for the negative camber gain that will occur entering a corner. Static RF negative camber needn't be set as high. Excessive static camber settings at the RF, could cause the RF to be "over-cambered" due to camber gain that will occur as the suspension goes through it full course of travel.
There are several factors that determine how much camber gain occurs; unequal length upper and lower control arms, different upper and lower control arm angles, spindle heights, front roll center, the stiffness of the front springs, sway bar diameter, tire and wheel deflection. Because of all these factors, we must rely on tire temperatures to properly adjust for camber angles.
In NASCAR 2003 we are allowed a wide range of adjustment for the front tires. +7 is the most positive camber allowed, while -7 is the most negative camber allowed. In the rear we are only allowed adjustments of +1.8, 0 and -1.8.
On an oval track it is typical for the outside edge of the RF tire & the inside edge of the LF to be 20 degrees cooler or more. This is because of the way the tires travel down the straightaway. On a larger track with longer straights, this spread will be even further. On an oval, the RF tire will have more negative camber, thus resulting in the inside edge of the tire contacting the track more than the outside edge giving you the higher temperature. On the LF you will run with more positive camber, so just the opposite holds true. While cornering these temperatures should even out if you have the correct amounts of camber & or weight transfer. The more camber you run, the higher these spreads will be. On a small track were you spend a lot of time cornering, you'll find the spread not as high. This is because you're spending more time cornering than on the straights, thus distributing the temperatures across the face of the tire more evenly. If you try to achieve even temps across the tire you may develop a push. This is telling you that you have too much positive camber. Although the tire may be flat on the track, on a straightaway, the tire will not be flat on the track while cornering.
On all tracks except road courses you'll want to run with negative camber on the right front & positive camber on the left front. Running camber as such will create part of the pull to left that will help the car get through the corner easier. The more excessive the cambers the greater the pull can be. Running excessive amounts of camber will cause premature tire wear due to the fact that the tires aren't running on the full contact patch of the racing tire.
Another factor in determining camber is body roll. The more the car "rolls" over through a corner the more camber gain you will have in the RF. Body roll is determined by how stiff your springs & or sway bars are. The stiffer the springs and sway bars, the less body roll and camber gain you will have. So with a stiffer suspension, you may have to use more camber to get the results you're looking for. Conversely, you may have to use less camber with a softer suspension.
Rear camber is not as critical as front camber due to the fact that the rear end is solid axle. A cambered rear end is modified to let the tires rotate in a plane that is not perpendicular to the axle's rotation. The same theory holds true when comparing the RF and the RR, as well as the LF and the LR. You might want negative camber on the RR & positive camber on the LR on an oval track. On a flatter track you may not need any camber in the rear. Running a higher tire pressure in the RR than the LR tire will naturally create some negative camber in the RR & positive in the LR.
When competing on a road course like Watkins Glen or Sears Point or any track where your making both left & right handed turns you'll need to "square" up your camber or make it equally negative on both sides. You may find it advantageous to use slightly more negative LS camber for road courses that have more right hand turns than left.
The whole premise behind camber and the ability to adjust for it is to get your car's tires to lay flat on the track when cornering at high speed. Camber requirements will vary depending on springs, sway bars, and track banking.
Here is a general synopsis of how camber effects the handling of the chassis:
- More negative RF camber allows the car to turn into a corner quicker & will loosen up the chassis.
- Less negative RF camber takes away some of the pull to the left. The car won't turn in as quick into a corner & will tend to tighten the chassis.
- Too much or not enough RF negative camber can cause an understeer or tight condition as well as reduced braking capability.
- More negative LF camber will reduce the pull to the left while tightening the chassis from the middle out.
- More positive LF camber will increase the pull to the left & allow the car to turn into a corner quicker loosening the chassis.
- More positive camber in the RR will loosen the car from the middle out.
- More negative camber in the LR will loosen the chassis entering a corner.
Caster
Caster is the lateral tilt of the spindle or steering axis as viewed from the side of the car or the leaning forward or back of the tire at the top of the wheel. Do not confuse this with camber, which is the inward or outward tilt of the wheel at the top. Positive caster is when the wheel is tilted back toward the rear of the vehicle. Negative caster is when the wheel is tilted forward toward the front of the vehicle.
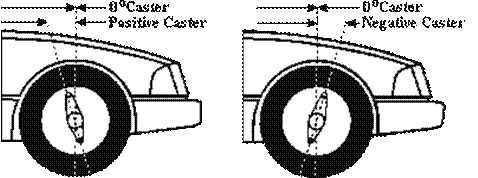
The picture on the left demonstrates positive caster while the picture on the right shows negative caster. The line that points to 0 degrees caster is the true straight vertical line. The lines that are angled are the centerlines of the spindle. The differences between these two angles are the number of degrees of caster you have either positive or negative.
Caster is the alignment, which gives the driver more or less feel of the steering. Positive caster is used to provide directional stability and prevent wandering. Directional stability keeps the racecar traveling straight ahead with minimal steering corrections needed from the driver. Positive caster will resist steering efforts and align the wheel straight. Negative caster will have the opposite effect.
When setting your chassis you'll want to tip the top of the wheels back adding positive caster to provide you with that straight ahead directional stability. More positive caster will give you a better feel for the car and allow you to make better decisions about how the car is handling on the track. The more caster you run the better off you'll be in making decisions on what the car is doing on the track. There are NO circumstances where negative caster is preferred, even though the adjustment range within NASCAR 2003 is from -2.0 through +6.0.
Proper caster adjustments will vary with each individual driver as well as the steering device you may be using. (I.e. force feedback.) Other factors include the size & speed of the track as well as the amount of weight on your front end. A track like Daytona or Talladega will require higher positive caster settings than a track like Bristol or Martinsville. The lighter the weight percentages on the front wheels, the more positive caster you'll want as well.
Positive caster has its advantages, but it also has a down side as well. When you turn a car left with positive caster the LF rises while the RF drops. This changes the weight on all 4 corners of the car. In effect you're taking cross weight out of the car the more you turn the wheel (taking weight off the RF and LR). The more positive the caster, the more cross weight there is being removed. The more cross weight you remove the looser the car will get. This could be used as an advantage to help free up the car in the corners only when you are turning the wheels. Positive caster will also "create" negative Camber on the outside of the front wheels as the wheels are turned. The higher the positive caster the higher the negative camber gain. Simply adjusting caster may require additional adjustments to camber, depending on the track radius and how much steering is required to negotiate a turn.
Another element that must be considered is the caster split or caster stagger, as I like to call it. Caster stagger is simply using different caster settings on the LF wheel than the RF. When caster settings are different, your steering will tend to pull toward the side with the least amount of caster. Caster stagger is preferred because it helps the wheels to steer themselves into a corner requiring very little effort from the driver. On tracks where your only turning left, you would want a higher positive caster setting on the RF than the LF. This more positive caster on the RF will make the car pull to the left entering the turns.
Higher caster stagger does have some drawbacks. It will also take some feel out of the car and also force you to hold your wheel to the right down a straightaway. It also makes it more difficult to turn right should you have a need to make a quick adjustment on the steering wheel if you were to get loose or in avoiding an accident. Maneuvering in traffic and counter steering will prove to be more challenging. Caster stagger can also effect braking and may require brake bias adjustments to compensate for the amount of pull the car will have entering a corner. The amount of caster stagger required is up to each individual driver. As a general rule, a larger track with a wider radius (Michigan) will require less caster stagger than a track with a tighter radius like Martinsville. Higher caster stagger can be used to help turn the car through a tighter arc or radius through the corner. Don't confuse caster stagger with general caster settings I previously mentioned above. The larger or faster the track, the higher the positive caster settings you will use, and the smaller the caster stagger you will have between the RF and LF. The opposite will hold true on a track that is smaller and has slower speeds.
Caster stagger is NOT the only adjustment that will give you that pull to the left. Many other factors must also be considered. Camber settings, weight balance, tire stagger, tire psi, and track banking also plays an important role. Many newcomers will be uncomfortable with the pull to the left & many may even think that their wheel won't calibrate properly. This pull to the left is normal & is the preferred setup to assist drivers when entering the corners with ease. Most caster stagger settings will be between 2 & 3 degrees. In other words, if you ran 1 degree positive on the LF, you would run positive 3 or 4 on the RF.
Simulating the pull that a stock car gets in a game is going to yield different results for different types of controllers. To add to this variation, the Linearity setting you choose in setting up your controller, in combination with the steering ratio you choose within the setup is going to contribute in making the pull feel different from user to user. On any given controller, setup the Linearity towards the Non Linear side (say 10%) You will notice the need to use a lot more counter steering on the straight than somebody using 90% Linearity with the exact same setup.
Do you see real drivers using counter steering down the straightaway? No, because they can center the wheel on the steering shaft. Is the pull still there for them? Yes. You can get your controller to center on the straightaway by how you calibrate it, get rid of it entirely if you like. Will you still feel the pull? No, why? Because the pull you're feeling is from the tension on the springs, bungee, or whatever your controller uses to center itself. Your controller isn't hooked up to the suspension of a stock car, so you're not going to be able to feel the dynamic pull that the suspension creates. Furthermore, your steering wheel doesn't have the range of motion as a real car. At best you're probably getting from 240 to 270 degrees of motion, and much less on a Joystick (maybe 90 degrees if you're lucky?) A real car has what, maybe 3 to 4 full rotations from lock to lock? With this in mind the game has to have Steering Ratio values that can compensate for the lack of true lock-to-lock movement. The differences in degrees of lock to lock motion between a joystick and a wheel is why the Linearity setting makes such a big difference, it has to in order to make all types of controllers usable. You just need to find the setting that is comfortable to you.
Here is a general synopsis of how caster effects the handling of the chassis:
- More positive caster will loosen the chassis the more the wheel is turned through a corner.
- More positive caster will allow you to catch slides on exit a little easier.
- The more positive the LF caster, the more the chassis will loosen at corner entry and mid-corner.
- Caster adjustments are better felt through a force feedback wheel.
- The car will pull to the side with the least amount of positive caster.
- The higher the caster stagger, the easier the car will turn into a corner.
- The higher the caster stagger, the less steering effort required. This will tend to give you a loose feeling upon corner entry, and may require slight counter steering and/or throttle input if braking is used.
- The higher the caster stagger, the less steering will be required when exiting the corner.
- Too little caster will cause the steering to feel sensitive
Compression (Shocks)
When talking about compression in N2003, were talking about shock absorbers. Before I talk about the specifics of shock compression I need to explain the basics behind shocks in general. Of all the questions I am asked regarding setup options, shocks are by far the most asked & most misunderstood of all the setup options available to us in N2003. Understanding shocks & how they work will give you a major advantage over those that don't. Controlling the chassis with the proper shocks is the key to getting through a corner smoothly & effortlessly. Shocks are used to help control handling problems & can even be used to induce desirable handling characteristics.
Shock absorbers do not absorb shock. Springs absorb shock. Shocks actually dampen the energy stored in the springs. Shock absorbers are devices that resist movement and are designed to control the compression and rebound of the suspension caused by weight transfer as well as bumps. A shock controls the speed at which the spring moves. Without shocks a car would handle like a boat in the water, swaying back & forth while moving up & down. Shock absorbers are used to eliminate this unwanted roll & pitch of the chassis as it corners. Shocks control how quickly the weight is transferred.
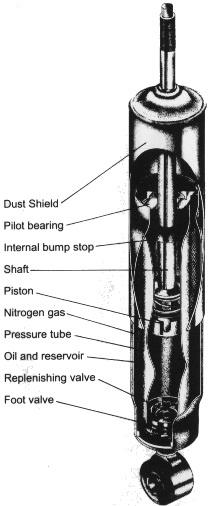
When a tire hits a bump on the track, or weight is transferred as the chassis enters a corner, the wheel and suspension moves upwards causing the spring to compress. In compressing, the spring absorbs the energy of the impact and then releases this energy by expanding. Further expansion and compression of the spring after the impact of a bump or weight transfer is unwanted and this is what the shock is designed to prevent. Shock absorbers are mounted between the lower control arm and the frame. For a spring to expand and compress so must the shock absorber. The shock resists this movement by controlling the flow of oil inside the shock through a number of control valves.
With each extension and compression of the shock, known as a 'stroke', a piston moves up and down inside the shock and oil flows between the inner and outer chambers of the shock, known respectively as the 'pressure cylinder' and 'reservoir'. The oil must pass through tiny valves, which open and shut depending on the direction of the oil flow. The valves are precisely engineered to provide a measured resistance to the flow of oil. The spring-loaded valve only opens to allow oil to pass through when enough force is supplied. This force is generated by the speed at which the shock is extending and contracting. As the stroking speed of the shock increases, more valves come into play to resist the flow of oil. Thus the shock is sensitive to the amount and speed of suspension movement and is designed to supply precisely the amount of resistance required at any time to ensure that the suspension's spring remains in control, performing its intended role.
Shocks used on WC teams are rated from 1 through 9. 1 being very soft while 9 being very stiff. We also have the same choice for shock adjustments within NASCAR 2003 at all Four Corners of the car at tracks where NASCAR doesn't mandate specific shock settings. Shocks are numbered for both compression & rebound. The compression of a shock is when it is being pressed down. The rebound is when it is being pulled back up. By adjusting the valving (changing the numbers) within the shock, we are able to change the stiffness or weakness of that shock when it is both compressed & pulled back or rebounded.
When you have a shock that has the same number compression as rebound it is said to be a 50/50 shock. This means that the shock when compressed has the same resistance when pulled apart. A shock with a compression rating of 9, & a rebound rating of 9, is telling you that the shock is really hard to compress & just as hard to pull back apart or rebound. A shock with compression rating of 9 & a rebound of 1 is what they call a split-valved shock. This shock would be stiff to compress, but would rebound or pull apart real easy. Through adjustment of the shock valves you are able to control how quickly weight is unloaded left to right, & front to rear. By adjusting the valving of each shock you can fine-tune your chassis through a corner. Once you understand this concept of how shocks work, you will be able to use that knowledge to turn faster & more consistent laps.
One of the reasons shocks are so difficult to figure out are because at any time through a corner it is possible that all the shocks can be either compressing or rebounding or a combination of both at any one corner of the chassis. Bumps on the track surface add to the possible combinations that may occur. When discussing shock tuning in depth, a basic understanding of dynamic weight transfer and its effect on tire loading is necessary. Dynamic weight transfer is the transferring of weight from side to side during cornering, from rear to front during deceleration and from front to rear during acceleration. The distribution of weight that transfers is affected by the rates of the springs used in the chassis. Basically, if one of a pair of springs receiving weight is stiffer than the other, the stiff spring receives proportionately more weight than the soft spring. The rate at which a tire is loaded or unloaded during dynamic weight transfer is affected by the compression & rebound of the associated shock. In rebound, a stiff shock slows down and a soft shock speeds up the unloading process. In compression, a stiff shock slows down and a soft shock speeds up the loading process. However, excessively soft or stiff shocks can produce effects opposite to those stated. Consequently, by changing the stiffness of the shocks used on a racecar, we are adjusting the loading on the tires at different points on the racetrack. If done correctly, good handling will result.
The easiest way for me to explain when a shock is doing it's most work, is by using an ordinary automobile as an example. Imagine a vehicle going down the highway at 50mph straight ahead. Now imagine this vehicle slamming on its brakes. What occurs in the chassis? When you slam on the brakes all the weight is transferred to the front of the vehicle & the nose of the car dives while the back of the car raises up. What are the shocks going through in this state? The front shocks are being compressed & the rear shocks are extending or rebounding. Let's take the same street vehicle & imagine it at a stand still in a parking lot. Giving the car full throttle what occurs? Just the opposite of what was explained above. The front of the car lifts while the rear of the car squats. The shocks up front are rebounding & the rear shocks are compressing. Keep in mind the above comparisons are being used to help you better understand the basic concepts of shocks & how & when they perform. In reality there is a lot more involved because a racecar enters a corner with a lot more force which varies the degree of each shock & how much they are being compressed or rebounded. On a racecar you have a few more variables to think about. The shocks are doing most of their work through the corners not driving straight ahead. In order to understand how to adjust your shocks you need to relate with the chassis and where exactly you're having the difficulties in a particular part of the corner.
As an example let's pretend were at Martinsville entering a corner. You need to picture in your mind how the chassis is reacting based on weight transfer, body roll and driver inputs (steering, throttle, & brake). Martinsville is a track that requires a lot of brake usage. Therefore when you enter the corner you're on your brakes pretty hard. This causes weight to be transferred towards the front of the car. Your front shocks will be compressing at this time while your rear shocks will be rebounding. As you turn left the RF of the chassis is being more heavily loaded than the LF. Therefore your RF shock will become more compressed more than the LF. As you turn the car left and it begins to take set near the middle of the corner you will begin lifting off the brake beginning to transition to throttle. What is happening to the shocks now? First as you turn more weight may be transferring to the RF so the RF shock could be still in compression, but what about the LF? The LF could be now rebounding as you turn left and lift off the brakes. The rear shocks may now begin to compress a bit as you roll off the brake. Because weight is still being transferred more towards the right, the RF shock should be compressing more than the LF. Continue on through the corner picturing in your mind how the chassis is rolling and weight is being transferred through the corner at each end of the car. The more throttle you apply to exit the corner, the more weight there is now being distributed towards the RR. Therefore the RR shock will begin to compress more, as could the LR. The RF shock may still be compressed but will begin rebounding as throttle is being applied as you exit the corner and enter the straightaway.
You need to understand what state your shocks are in before you'll be able to decide on which one needs to be adjusted. You'll first have to figure out where in the corner your trying to find speed and what state your shocks are in before you'll know what corner shock you should be adjusting on. You'll have to know if the shock is going through compression or rebound at that point in the corner and adjust accordingly. This is one of the reasons shocks are more difficult to understand and figure out when making adjustments to them.
In general if your having troubles getting into the corner at a track like Martinsville, you would adjust the front shocks compression, & or the rear shocks rebound, since that's the stages of the shocks being utilized upon entry into a corner. If your having problems exiting the corners under acceleration, you would look at adjusting the rebound of the front shocks, & or the compression of the rear shocks. But what if it's a track like Daytona or Talladega? What about tracks that have high-speed corners versus those low speed corner tracks like Martinsville? As if it wasn't confusing enough we now add aerodynamics into the equation and it opens up an entirely different thought process on what is occurring with the shocks. Rear shocks that were once rebounding at Martinsville entering the corner can now be compressing if enough air is being forced over the rear spoiler creating downforce at the back of the car. Your not braking on tracks like these so therefore the weight transfer isn't the same as it is at a track like Martinsville. And what about wind? A strong wind blowing in a particular direction can cause an aero condition that can throw off your whole thought process in how your shocks are reacting at a particular corner of the track. All these factors must be considered when deciding on what shock to adjust and in what direction to adjust it. Add to the fact that adjustments can be made asymmetrically from left to right & or front to rear, & it opens up all new options & possibilities for additional adjustments that can produce different results.
The balance of traction between the left side and right side tires determines to a great extent how the car will handle while decelerating through the corner. For example, a racecar will tend to push whenever the left side tires do not have enough influence in stopping the car (the right side tires are slowing the vehicle more than the left so the vehicle tends to go to the right). By using stiffer shocks (especially a stiffer rebound on the LR & LF), the unloading process of the inside tires (due to dynamic weight transfer) to the outside tires slows. Consequently, the left side tires remain loaded further into the corner, which helps to turn the chassis. This should allow a car to drive in deeper & remain more balanced throughout a right-hand turn. Softer left side & or rebound would give just the opposite results.
Asymmetrically changing the front or rear shocks can also give different results on the handling of a chassis. Decreasing the rebound on both front shocks allows the weight to transfer quicker from the front to the rear under acceleration. This will loosen a chassis more as throttle is applied. (Stiffer means less grip on that end) Therefore with stiffer shocks on the rear, it would mean less grip on the rear tires. Increasing the rebound would produce just the opposite effects. Asymmetrically adjusting the rear shocks will also produce different effects as compared to adjusting individual corners.
Shocks & springs do work alike. If you understand springs (read the section on springs) you will have a better understanding of how shocks operate. All of the asymmetrical theories that apply to springs also apply to shocks in much of the same manner. In other words a stiffer RF shock will tighten a chassis much the same as a stiffer RF spring will, albeit to a much lesser degree. A stiffer RR shock & spring will loosen the chassis, etc. etc. Stiffer front springs & shocks will make a car tight. (Stiffer in this instance means less grip at the front) The shocks must be in sync with your springs. If you increase your spring rate you'll probably want to decrease shock compression, and increase shock rebound, and vice versa.
The part that throws people for a loop in regards to shocks is when after an adjustment is made the results are unseen or not felt in the chassis immediately. To begin with you're not always going to feel a major change. Shocks adjustments are a fine tuning device only to be used after the rest of the chassis is close to being neutral or stable. The easiest ways to adjust shocks and get a feel for how they work are to adjust them as a 50/50 shock. Or in other words start out adjusting the compression & rebound equally the same. Say 9 compression 9 rebound, or 1 compression 1 rebound. With a 9/9 shock you have a shock as stiff as it gets. A 1/1 is a weak as it gets. Try these settings one at a time at different corners of the car to see the changes and how they affect the handling of the car. A 9/9 on the RF will tighten the chassis all the way through the corner. While a 9/9 on the RR will loosen the chassis all the way through a corner. A 1/1 will have just the opposite effects. Once again I bring up stiffer equals less grip on that corner. Stiffer RF equals push because the RF will have less grip & begin to slide. Stiffer RR & that tire will have less grip & slide which will make you loose. I highly doubt you'll ever use a shock as is mention above in your final setup, but these recommendations are only to help you get a feel for what a shock does. Sim racing doesn't allow us to feel the car beneath us through the seat of our pants. Experimenting with a drastic shock adjustment one way or the other may help you better understand what you're trying to accomplish in achieving an overall well-balanced setup in your car.
Now that I've explained a lot of basics about shocks, its time to discuss the main topic and that's shock compression. Let's begin with the front shocks. Increasing the compression on the RF will tighten the car on corner entry. This places more loading on the RF quicker and keeps more weight on the LR longer. Lowering compression will have the opposite effect and will loosen the chassis. On the LF increasing compression will loosen the chassis on corner entry. This places more loading on the LF quicker and keeps more weight on the RR longer.
Shock compression at the rear will affect how the chassis performs exiting the corners. Increasing compression on the RR will loosen the chassis exiting the corner. Lowering compression will have the opposite effect and will tighten the chassis on corner exit. At the LR compression will have the opposite affect than the RR. Increasing compression on the LR will tighten the chassis on corner exit. Lowering compression will loosen it up on exit.
It's important to note that when working in combination with rebound at the opposite end of the car, it can influence further how quickly weight is transferred to that particular end. For example, if you're loose when exiting a corner you have the option of lowering compression at the RR to tighten the car up. Or you could increase compression on the LR. Or you could do both which would have a greater effect that adjusting just one side. To take this even further you could lower the rebound of the front shocks to allow weight to transfer quicker to the rear. I'll discuss rebound further in a separate section. You can see that there are many possibilities when it comes to adjusting shocks and the various combinations and degrees as to how quickly you want weight to be transferred.
Before adjusting shocks, you need to visualize how weight is being transferred at each corner upon turning, deceleration, braking, & acceleration. As far as the transition effects themselves go, there are three things to consider; first is the amount of load transferred, second, how quickly it is transferred, and lastly, where it is transferred. Starting with the latter, load is always going to transfer to the same places given that we're talking about going straight, decelerating, turning left, accelerating, and going straight again. Breaking the first two considerations into specific events, adjusting the shock properties can provide differences in both time and amount of load transferred. Shocks do not control where or the order in which weight is transferred. The net result of a specific event can change slightly from corner to corner due to bumps and dips in the track surface. We may need to deviate from optimum shock properties for transitional load changes during cornering to compensate for these road handling and surface irregularities. With a better understanding, you will have a much easier time deciding which shock(s) to adjust to help cure or smooth your corner transitioning problem properly.
Proper compression & rebound settings basically come down to what a driver feels more comfortable with. What works with one driver might not necessarily be correct for another. This is due to the fact that different drivers have different driving techniques. Smooth throttle, brake and steering transitions will require slower shock travel because weight isn't being transferred as quickly compared to those drivers that use abrupt throttle, brake, and steering transitions.
Here is a general synopsis of how shock compression effects the handling of the chassis:
- The stiffer shock or shocks produce the least amount of grip.
- The stiffer the FRONT shocks, (higher the number) the tighter the car will be when braking.
- The softer the FRONT shocks, (lower the number) the looser the car will be when braking.
- The stiffer the REAR shocks, (higher the number) the looser the car will be under acceleration.
- The softer the REAR shocks, (lower the number) the tighter the car will be under acceleration.
- Stiffer compression on the right shocks will help the car turn in by also slowing weight transfer to the right.
- If you increase your spring rate you'll probably want to decrease shock compression.
- If you decrease your spring rate you'll probably want to increase shock compression.
- Adjusting the compression on the front shocks will affect how the chassis performs entering the turns.
- Adjusting the compression on the rear shocks will affect how the chassis performs exiting the turns.
- Increasing compression on the RF will tighten the chassis on corner entry.
- Lowering compression on the RF will make it looser.
- Increasing compression on the LF will loosen the chassis on corner entry.
- Lowering compression on the LF will make it tighter.
- Increasing compression on the RR will loosen the chassis exiting the corner.
- Lowering compression on the RR will tighten the chassis exiting the corner.
- Increasing compression on the LR will tighten the chassis exiting the corner.
- Lowering compression on the LR will loosen the chassis exiting the corner.
Rebound (Shocks)
When talking about rebound in N2003, were talking about shock absorbers. Before I can talk about rebound you need to understand the basics behind shocks and how they perform. I'm not going to go into how this all works again in this section because I explained it all in the section titled compression. If you haven't yet read that section, I highly recommend you jump to that section first and read it through in its entirety before continuing on with this section. Doing so will help you avoid a lot of the confusion associated with shocks and it will give you a better understanding on what I'm talking about here. Both the compression and rebound sections sort of go hand in hand since were actually dealing with the same chassis component.
When talking about the rebound of shocks were talking about the time in which they are being expanded or pulled apart. When weight is transferred forward during braking the rear shocks can be rebounding. When accelerating the front shocks can be rebounding as weight is transferred towards the rear. Notice I say can be. It's important to picture in your mind how the chassis is transferring weight in regards to how you're shocks are reacting. For example I mentioned when accelerating the front shocks could be rebounding. But if your still in a corner with a tight radius accelerating and turning left, enough weight still may be transferring to the RF so the RF shock still could be in a state of compression while the LF shock is rebounding.
It's important to consider aerodynamics when understanding whether your shocks are compressing or rebounding. Shocks may be compressing on a track with high speeds and a lot of aerodynamic down force. Where on a smaller track those same shocks could be going through rebound.
Shocks are one of the most difficult setup options to figure out due to the state at which shocks are going through during different transitions throughout a corner. Proper shock settings vary with each driver. A driver that uses smooth throttle, brake and steering transitions will require slower shock travel because weight isn't being transferred as quickly compared to those drivers that use abrupt throttle, brake, and steering transitions. All these factors result in a lot of confusion and misunderstanding when it comes to adjusting shocks. Those that take the time to learn and understand how shocks are reacting throughout the corner will have a distinct advantage over those that do not.
Here is a general synopsis of how shock rebound effects the handling of the chassis:
- The stiffer shock or shocks produce the least amount of grip.
- The stiffer the FRONT shocks, (higher the number) the tighter the car will be under acceleration.
- The softer the FRONT shocks, (lower the number) the looser the car will be under acceleration.
- The stiffer the REAR shocks, (higher the number) the looser the car will be under braking.
- The softer the REAR shocks, (lower the number) the tighter the car will be under braking.
- Stiffer rebound on the left shocks will help the car turn in by slowing weight transfer to the right.
- Increasing rebound on the RF will loosen the chassis exiting the corner.
- Lowering rebound on the RF will tighten the chassis exiting the corner.
- Increasing rebound on the LF will loosen the chassis exiting the corner on tracks where corner speeds are high. The chassis will react just the opposite in low speed corners.
- Lowering rebound on the LF will tighten the chassis exiting the corner on tracks where corner speeds are high. The chassis will react just the opposite in low speed corners.
- Increasing rebound on the RR will tighten the chassis on corner entry.
- Lowering rebound on the RR will loosen the chassis on corner entry.
- Increasing rebound on the LR will loosen the chassis on corner entry.
- Lowering rebound on the LR will tighten the chassis on corner entry.
Differential Ratio
The differential is a gear assembly in the rear end whose purpose is to distribute torque to the rear wheels for traction as well as to differentiate wheel speed from left to right while cornering. Various ratios are used within the differential that allows the wheels to rotate at different speeds. The differential acts as the final gear reduction in the vehicle, slowing the rotational speed of the transmission one final time before it hits the wheels.
NASCAR teams use the Ford 9-inch rear end due to its superior strength, durability and ease of use. A well-built Ford 9 inch is virtually indestructible. The gears and differential are housed all together in a single assembly called the Third Member. This makes it possible to quickly change gear ratios by simply replacing the entire third member with the appropriate gear ratio already in place. In NASCAR 2003 we have the ability to change these gears allowing us to run different ratios for different size tracks. Clicking the drivetrain/aero tab on the garage screen can access this adjustment.
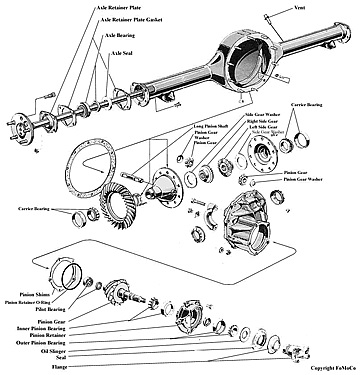
Exploited view of the Ford 9" rear end
There are many different types of differentials on the market that can be used to differentiate torque action and distribution on each wheel. These include the open differential, locker differential, mini spools or locked rear ends, as well as various types of torque sensing differentials and even electronically controlled devices that help distribute torque to the left or right wheels.
As a racecar corners, the outside wheel speed is increased while the inside wheel speed is decreased. This is due to the fact that the outside wheel has a larger radius to turn than the inside wheel. The reason for so many types and styles of differentials is to control where and when the torque is being applied and to what wheel. It is critical that the differential provides more torque to the wheel that has traction, while it lowers torque on the wheel that wants to spin.
The ratio expresses the number of turns required by the pinion (which is attached to the output shaft of the transmission) to turn the drive axle one revolution, i.e. 2.857 means the pinion must turn 2.86 times to turn the drive axle once. A higher number (6.556) means a lower (or shorter) gear. Short gearing gives quicker acceleration, but because the engine must turn faster, fuel mileage and top speed are lower. Tall gears give smoother acceleration and higher top speed, at the expense of quick acceleration.
We are allowed to choose from no less than 49 different ratios with an adjustment range from as low as 2.857 to as high as 6.556. The differential ratio you will need is different for every track you compete at & is the most common gear changed on a WC racecar. When you change the differential ratio, you change all the final drive ratios together proportionally.
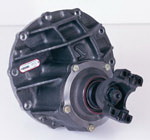
Ford 9" center section that contains the gear assembly.
On short tracks you will want to choose a higher differential ratio because quicker acceleration will be a must at tracks where speeds are not as high. At superspeedways you'll want a smaller ratio for top speed since quick acceleration is not necessary on a track where you're at full throttle most of the time. The most important factor when considering what ratio to use is that you don't choose a ratio that is too high. Too high a differential ratio will result in running higher rpms. If, by the time you reach the end of a straightaway, you're running higher than 9000 rpms, you risk having your rev limiter kick in. This will result in a loss of torque & thus a loss of speed. The rev limiter is used to prevent us from running too high a rpm, which could result in a blown engine. You must watch your tach when changing gear ratios. If you're running too high a rpm you will also notice it through the sound of your engine as a "missing" sound.
As you adjust other chassis components, you will most likely find yourself having to change your differential ratio. As you find more speed through the corners, you'll eventually find yourself on the throttle quicker. Since you're on the throttle sooner you will be running a higher rpm towards the end of a straightaway. This is likely going to force you to make a differential change.
Differential ratio synopsis:
- The higher the ratio/number (6.556) the higher the rpms. Provides quicker acceleration, but slower top speeds.
- The lower the ratio/number (2.857) the lower the rpms. Provides slower acceleration, but higher top speeds.